Monthly Archives: August 2008

Japanese knitting books

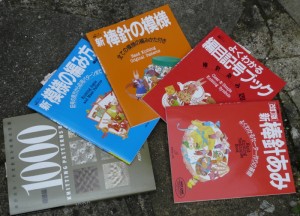
A parcel arrived a little while ago containing some books I had ordered from Amazon in Japan.

They are all in Japanese, but have fantastically clear diagrams. I get the impression that I would probably learn even more if I actually could understand the Japanese, but the diagrams are numerous and well thought out enough that one can learn a lot just from looking at the pictures.

First, on the right is the Hand Knitting Techniques Book, which is really pretty self-explanatory. There are 80 pages, and it takes you right from how to form a knit stitch and a purl stitch, through casting on and off, decreases, increases and several fancier textured stitches. A lot of the techniques I already have descriptions of in other books, but I do find the diagrams in this book to be exceptionally clear. Also they really do illustrate every step of a stitch, with lines drawn on to show exactly where your needle or yarn should be going. There are also a few techniques, particularly some of the textured stitches that I haven’t come across in other sources. I found the approach to the cast ons very interesting. Although they only really demonstrate the tubular cast on and the long tail cast on there are lots of different variations, and how to work them in particular circumstances which I am looking forward to experimenting with.

Next is Clear & Simple Knitting Symbols. One of the nice thing about Japanese knitting patterns is that they have a standard set of symbols which every pattern uses. This book is basically a key for those symbols, along with diagrams of how to do them. There are 74 pages, and while it does cover casting on and off it is a lot briefer on the subject than Hand Knitting Techniques Book. It does show a knitted sample for lots of different stitches, along with the Japanese chart symbol for the stitch, and instructions on how to do it.

The last three are stitch dictionaries, Hand Knitting Original Patterns, Knitting Signs and Make Patterns, and 1000 Knitting Patterns Book. The 1000 Knitting Patterns Book also contains crochet. Inevitably there is some overlap between these books and ones I already own, but there are also some stitches in these that I haven’t seen before. Particularly interesting are the combined stitches, so fair isle and lace, or cables and lace. Also some interesting textures created by variations on knitting into the stitch of the row below, or of several rows below.

The postage from Japan is quite expensive, I imagine because books are quite heavy. All in all though I think these are a good addition to the knitting library. There are several stitch patterns I have earmarked already to have a play with, and I am also keen to experiment with the different variations on the tubular cast on, and on ways to close the gap on stocking stitch short rows.

Interruption

I am in the process of attempting to change website hosting providers. Hopefully this should all go nice and smoothly, but just in case it doesn’t, if things are a bit wobbly for a while then I am on the case, and hopefully I will get it sorted out soon.

More knitting related stuff soon.

Supercook socks

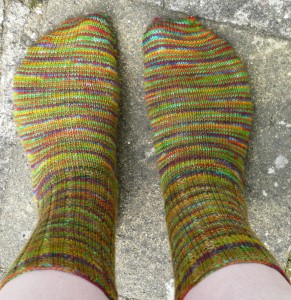
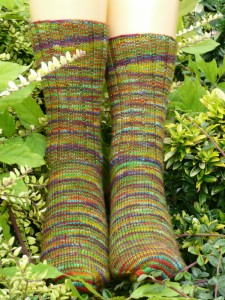
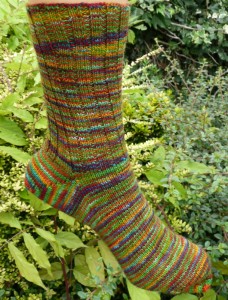
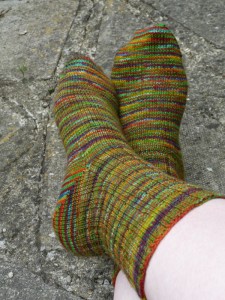
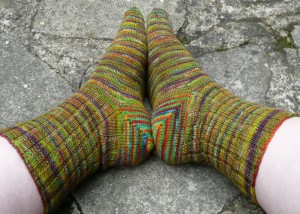
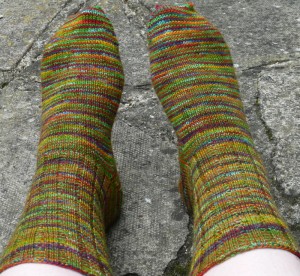
In a fit of efficiency I have actually managed to photograph a finished object (well a pair really) only hours after they came off the needles.

This is the yarn I dyed with Supercook food colouring a couple of weeks ago.

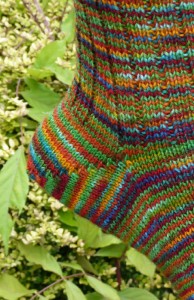
It is my usual ribbed sock pattern, with short row heel. This time I tried out yarn over short rows. Again I am having trouble with getting them even, one side is reasonably nice but the other is a bit sloppy. Back to the drawing board on that one, I have another idea to try.

For a quick recap, the yarn is 4ply / sock weight Blue Faced Leicester superwash, from H W Hammand. It is very nice yarn to knit with, and the socks are lovely and comfy (I am wearing them as I type).

I love how these have come out.

I will be interested to see how well the colour lasts, and also how the yarn washes and wears. The yarn is quite smooth but with a small halo.

You can tell how much I love them by the ridiculous number of photographs I have taken 🙂

Distortion

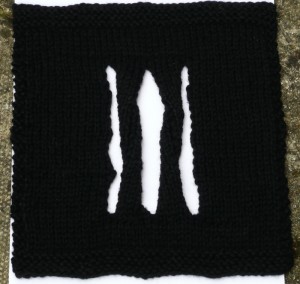
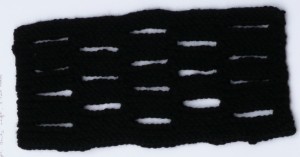
Our homework for the July City and Guilds class was on stitches which distort the fabric, slits, slots, dropped stitches and elongated stitches.

My first two samples are in black, which unfortunately didn’t photograph very well. The first shows vertical slits in the fabric. Each section is knitted separately and then they are all united in the row that joins the slits. I gave each of the interior sections a one-revolution twist, one in each direction, before the join.

The second sample is of horizontal slots in the fabric. These are made like large horizontal button holes.

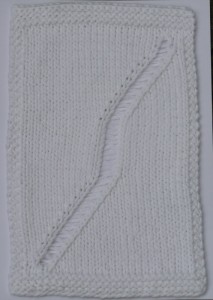
Then we moved on to dropped stitches (intentionally that is). The extent of the dropped stitch is controlled with a yarn over. The yarn over is worked at the point you would like the dropped stitch to stop unravelling. I like to mark the stitch I am going to drop with a safety pin so I can keep track of it as I am knitting. You can make it travel across the knitting using balanced increases and decreases, make a decrease on the side of the marked stitch that you would like it to bend towards, then make a corresponding increase on the other side so that the total number of stitches remains the same. For this sample I only used one dropped stitch. Since the stitch is wider once it has been dropped, I made two decreases at the start of the dropped section, one on either side of the yarn over. Then made two corresponding increases once I had dropped the stitch at the top of the section.

Next onto more elaborate patterns. These are all from Barbara Walker’s A Treasury of Knitting Patterns.

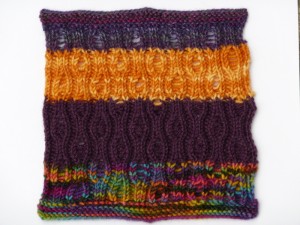
First Vertical Drop Stitch:

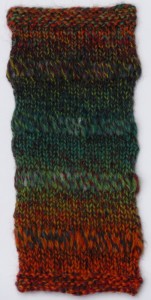
It was interesting to see how this looked with different yarns. They are all wool, apart from the top purple which is 75% wool, 25% nylon. I think this pattern actually looks quite good in the yarn with a slight variation of colour, but the very multicoloured yarn at the bottom is too much and obscures the pattern.

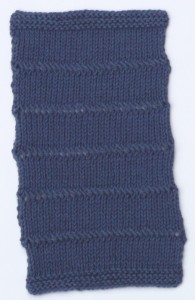
Next elongated stitches. Elongated stitches are created by wrapping the yarn more than once around the needles when a stitch is created, then dropping these extra wraps on the next row. First Simple Elongated Stitch:

Then the slightly more complicated, Twisted Elongated Stitch:

They were all fun to do, though I am not sure whether I would incorporate the slits or slots into a garment. They might be fun if you wove ribbon through them. I find the change in texture interesting when you have a line of elongated stitches or dropped stitches and I’m sure you could create something which used that to good advantage

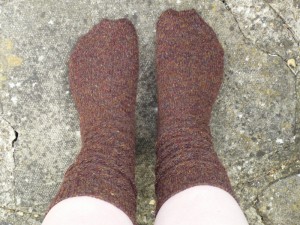
Concertina socks

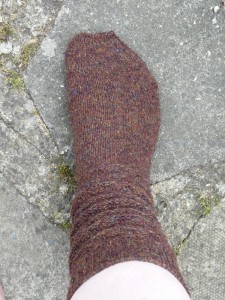
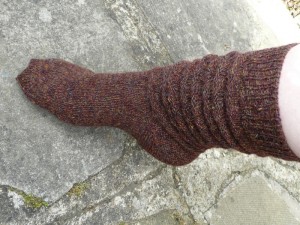
I finished these a little while ago now, and have finally photographed them (why do I feel that I am always saying this? I really must get round to photographing things more quickly after finishing them).

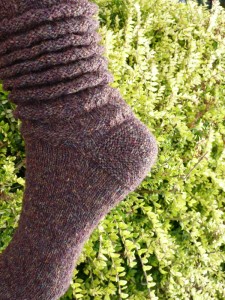
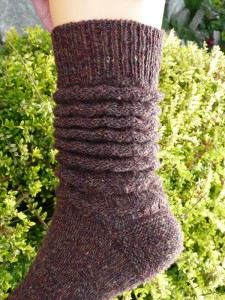
They are inspired by the Scrunchie Hand Warmers (Ravelry link) by Leah Oakley from 101 Designer One-Skein Wonders which Jo made. I used the same pattern for the leg, then did a garter stitch short row heel and a plain stocking stitch foot.

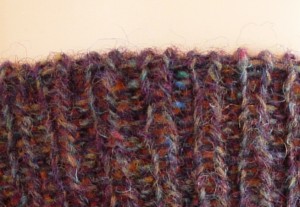
The yarn is 4ply Shetland, bought on a cone from Uppingham Yarns. The yarn is designed for machine knitting, and so comes oiled. This time I skeined enough off for the socks, gave it a nice wash, and then balled it up when it was dry. A much nicer knitting experience than knitting with the oiled yarn. I think oiled yarn varies a lot in how much oil there actually is in it. I have knitted with some of the ColourMart yarn, which although oiled doesn’t really feel it. I find that the Shetland, and the lambswool from Uppingham both make my hands feel quite sticky when I knit with the oiled versions. Also I was surprised at how dark and yucky the water was when I washed the yarn, so better out than in.

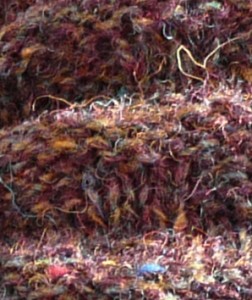
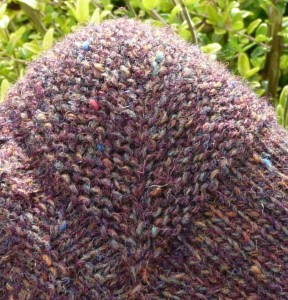
I love the colour, a really interesting flecked brown. You would be surprised at the different colours you can see when you look closely. Quite a lot of shades of brown, and some yellow, but also bright blue and red.

However I don’t think it is going to be a very hard wearing sock yarn. I wanted to try out the pattern, and the garter stitch short row heel, and will enjoy them while they last. I was thinking of using them as bedsocks once the weather gets colder.

The heel was really enjoyable to do, and I love how nice and symmetrical it is. It is one of the problems I have with all of the methods of stocking stitch short row heels that I have tried so far. Since you are working stocking stitch, you end up having to use two different methods to close the short-row gap, one for knit rows and one for purl rows, and I have yet to find a method where they actually look the same. Leaving you inevitably with one side of the heel which is neater than the other. This is conveniently eliminated with the garter stitch short row heel since all rows are knit, so you only need one method. Incidentally the method I use is to wrap the stitch like you would with a conventional wrap and turn. Then when it comes to close the gap you just ignore the wrap, and because of the way garter stitch lies the wrap just looks like another stitch.

I think this is my favourite heel so far to make and look at. It hasn’t been cold enough yet to wear them, apart from a quick modelling session, so it remains to be seen how comfortable they are and how well they wear.

These took me a while to make, partially due to my experimenting with different tubular cast-ons. The effect being that I lost count of the number of times I casted on, knitted a few rows, decided I didn’t like it and tried again. Luckily I have a whole cone of this yarn, I’m not going to run out any time soon.

The upshot of all the experimentation was that a couple of the methods don’t come out stretchy enough when I do them, but I did find a method I liked. I settled on the following method:

  • Provisionally cast on half the stitches you need (I like the crochet over the needle method).
  • Foundation row: Work k1, yo all the way across, join in round.
  • Row 1: k1, slip 1 with yarn in front. Don’t pull the yarn too tight on the slip stitches.
  • Row 2: slip 1 with yarn in back, p1.
  • Repeat Rows 1 & 2 once more.
  • Start your k1, p1 rib.
  • After a few rounds you can take out your provisional cast on.
  • Ta da! Admire your lovely stretchy tubular cast on.

This is Tubular cast-on: version A in “Vogue Knitting”: The Ultimate Knitting Book, doctored so it works in the round.

The only difficulty with this cast on is that it doesn’t really work with my preferred cuff rib. Usually I like to work a 3×2 rib cuff, decreasing to a 3×1 rib for the legs. Really this cast on only works for a 1×1 rib. The other main method of tubular cast on can be fiddled to get a 2×2 rib but it does require some gymnastics. I think I will do some more experiments.

Knitting with colour

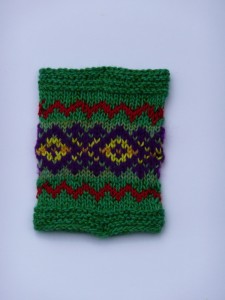
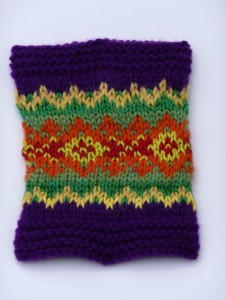
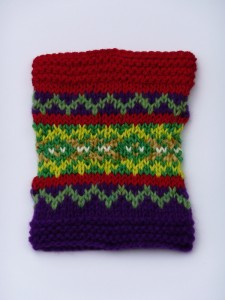
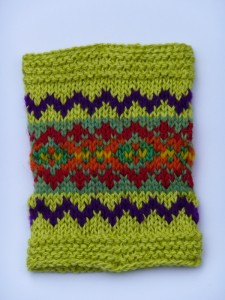
Our homework for the June City and Guilds class was knitting with colour; stranding, weaving in, and intarsia.

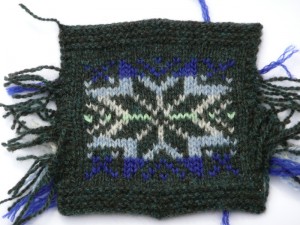
My first sample was an example of stranding:

I did this one by knitting flat, then at the end of each row, snipping the yarn and, after zooming the stitches along to the other end of the circular needle, re-joining the yarn so that I could knit the next row, rather than purling back. The pattern is a traditional one, sometimes called Norwegian star I think. The yarns are all 4ply weight Shetland, apart from the darker blue which is an oddment and I think is probably acrylic, I’m not sure where it came from actually. I enjoyed knitting the pattern but didn’t enjoy the fact that this method meant it was hard to get the first and last stitches of each row neat and not sloppy. In light of this I worked all my other stranded samples circularly. It may be bizarre but I would rather do twice as much knitting and have it neat 🙂

With the stranding the yarn is just held loosely at the back of the work when it isn’t being knitted. Our next sample was weaving in, where the non-working yarn is woven into the working yarn every other stitch in the same way that you would weave in yarn ends.

As you can see, the yarn being woven tends to show through to the right side. This is particularly obvious if, like I have, you have used yarns which contrast a lot in lightness and darkness. This does allow you to make large blocks of one colour while still knitting in the round with relative ease.

Next up, Fiona gave us a traditional pattern, and using the same selection of colours inspired from a picture, we had to colour in the pattern in a variety of different ways. My picture is of tulip fields in Holland 🙂

It really shows how a pattern can look different depending on the contrast between the background and the foreground. Value contrast really makes a difference. It is one of the problems I found with a couple of my samples, that I had put orange against green, and although they are very different colours, the particular shades I had chosen were very close in value. So if you photocopied them in black and white they would come out the same shade of grey. This means that particularly from a distance the pattern is not clear, and just looks rather blurry.

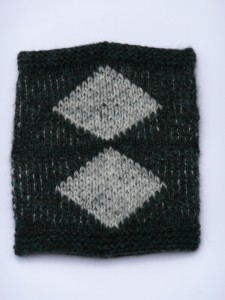
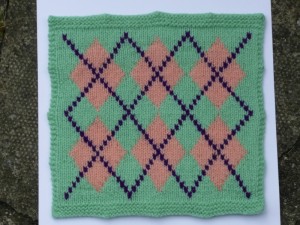
Lastly we did a couple of samples of intarsia. The first geometric, so I used an argyle pattern.

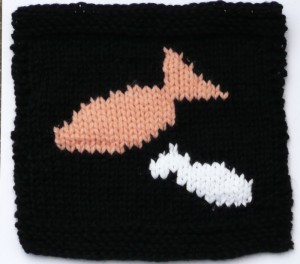
The second pictorial.

They are supposed to be fish.

These were all very enjoyable to do, it has been a long time since I did any intarsia and apart from tangling the yarns a bit it was all good fun. I am definitely going to do some colour work for my second project for the City and Guilds – I just need to get a move on with the first one! Speaking of which, I don’t think I have mentioned this on the blog yet. I will take some pictures as it already has most of a body and one sleeve.

Everything in moderation

Yes, I’m afraid today is the day of bad puns. You will be pleased to know that at the moment I can’t think of any others.

I seem to have been having problems with comment spam at the moment so I have turned on moderation. If you have already left a comment before, any subsequent comments should go through fine, but any comments from new people will have to be approved before they appear. I hope this wont be too much of a pain for anyone.

Thank you for all the lovely comments on my dyeing, it was a lot of fun and I can’t wait to do some more experimenting. I think that will hopefully be very soon, particularly considering the miserable weather we have been having here. C&G homework continues apace, slowed slightly by my computer spending time doing the electronic equivalent of lying on the floor and kicking its heels. I have talked nicely to it, and hopefully we are friends again now.

More soon, with actual knitting content!

Dyeing at home

After the excitement of the dyeing workshop with Jan, we couldn’t wait to get home and do some more experimenting. Since seeing the yarns Lisa from the Ash knitting group had dyed with food colouring I was very keen to have a go at that. Also I had some packets of Kool Aid picked up on a trip to America some years ago, and had bought some Jacquard acid dyes from Fibrecrafts which I was looking forward to playing with too.

We thought we would start with the least toxic and work upwards from there 🙂 Luckily when we replaced our microwave a few months ago I saved the old one (works fine, just a bit small and old, I bought it when I first went to university in 1995). So we could have a microwave dedicated to dyeing and not worry about cross contamination.

First off we soaked our yarns. I didn’t have any ammonium sulphate so we used white vinegar as a mild acid fixative. We soaked the yarn in water with a dash of washing up liquid, to remove any spinning oils and to act as a wetting agent, and a glug of vinegar for the acidity. As you can see this was a terribly precise experiment. The yarn we used this time was again blue faced leicester from H W Hammand, but this time the superwash sock weight. I tend to like to knit with finer yarns, and was interested to see how the superwash treated yarn would take up the dye. The yarn comes in 100g hanks, and we soaked two each, one for the food colouring and one for the acid dye, and soaked a hank each in plain water for the Kool Aid. The Kool Aid is already acidic so you don’t need to add extra acid.

While the yarns were soaking we mixed up the Supercook food colourings. Jan had given us a recipe of 1 tablespoon (15ml) of dye, to 2 tablespoons of water, and 1 teaspoon (5ml) of white vinegar. Using this ratio we mixed up two bottle of green food colouring, and one each of red, blue, and yellow. Each bottle contains about 3 tablespoons of liquid, so we mixed that with 6 tablespoons of water and 1 of vinegar. With the dyes all ready and waiting in disposable plastic cups, we laid out our cling film as before and arranged the damp yarn on top of it. One big advantage of this dyeing session was the opportunity it gave me to properly clean the kitchen worktops for possibly the first time since we moved in! We then covered the worktops with a folded out rubbish bag (to stop the dye dyeing the worktop) and a layer of newspaper (to mop up any spills) to create our workspace.
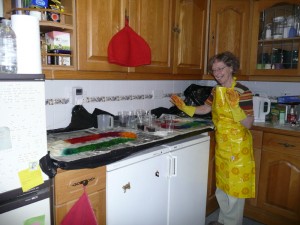
Happy dyer in action

Happy dyer in action

Once we had finished painting we wrapped up our cling film parcels, put them in a nice cheap pyrex bowl bought for the purpose and nuked them in the microwave for about 2 minutes. Then let them rest for 2 minutes, followed by another 2 minutes nuking. On the second nuking the cling film parcel started to puff up showing that steam was being produced, but to be on the safe side we gave it another round of rest and heat. After the third cooking, a careful prod of the parcel showed that the liquid remaining was pretty much clear and that the dye had all be absorbed by the yarn. We left the yarn to cool down for a few hours, and went to mix the Kool Aid. Luckily the microwave is right next to the back door since the smell of boiling vinegar is quite pungent!
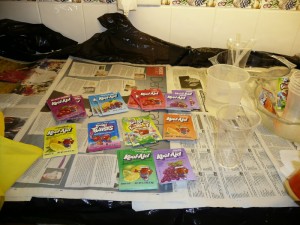
I picked up some of the Kool Aid several years ago on a trip to the states, and Paul brought me the rest back from a business trip. I was slightly worried when we first got it out (it had been lurking in one of my boxes of yarn for some years) that it might not work as the little packets had gone rather hard, but it turned out fine. After mixing up each of the sachets with a bit of water I was mystified as to why people would want to drink the stuff – the smell alone is really quite headache-inducing. I think the grape one is worst, reminds me of a kind of burnt plastic smell, not nice at all! Luckily we weren’t drinking it though, and after a few washes I am pretty sure the yarn wont smell any more.
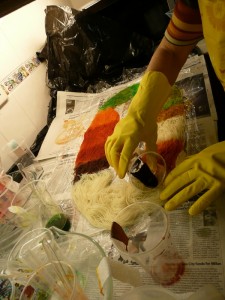
We cooked the Kool Aid dyed yarn in the same way as before and then moved on to play with the Jacquard acid dyes. I had bought 5 colours of dye to get us started, in colours which I hoped would all go well together. Blue, purple, turquoise, teal and emerald green. While I was right that they did go well together and combinations of them created other colours which also co-ordinated well, the obvious difficulty we discovered was that without any yellow or red there were a lot of colours we couldn’t create. I have rectified this now by buying yet more dye, this is looking like being as addictive as the yarn buying 🙂

We made up 1% stock solutions in each of the five colours, 5ml of dye powder to 500ml of water. We were being a bit more scientific in our experimentation at this point, I have even bought an exercise book to use as a dyeing notebook and have been writing down what we did. We then mixed some of them together, and diluted some to create paler colours, and got painting! These skeins got the same cooking treatment as the others, and then we waited impatiently for them to cool down so we could rinse them and see how it had all come out.

Unfortunately I don’t have any good photos of the yarn in skeins, I think I was too eager to wind it into balls and start knitting. It really shows the contrast though of how a yarn looks in the skein versus in a ball, and again the finished knitting. I think the ball gives more of an idea of how the knitting will come out, the colours are more mixed up than they are in the skein. I have found this before with hand dyed yarn I have bought, that I love the yarn in the skein where there are big blocks of colour but these colours look quite different when they are chopped up into lots of little pieces in the knitting. That is not to say that they aren’t nice in the knitting, just that they can often be quite different.

So onto the finished yarn, all wound into balls (I do enjoy the ball winder). First the yarn dyed with the Supercook dyes.
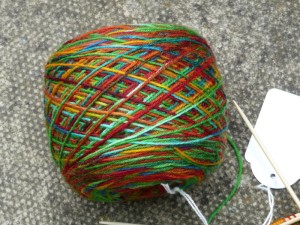
I was so impatient with this one that I have started knitting socks already.
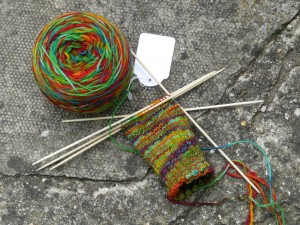
Then the Kool Aid, similar but a little different.
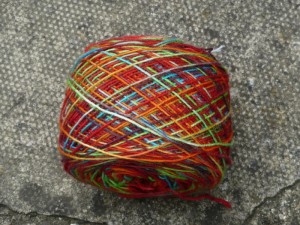
And finally the Jacquard dyed yarn.
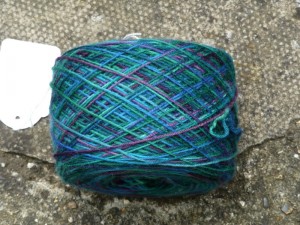
I am very pleased with how they all came out, and the dyeing itself was such a lot of fun. I am looking forward to having another session. I want to try mixing colours a bit more, and also doing different shades of the same colour which would hopefully work with more textured patterns. There are more photos of my dyeing exploits so far here, and I am hoping to add to them soon!